13 Steps to Build An IDX Real Estate Website With WordPress
Whether you are a new agent or a long-time broker, this guide will show you the steps to build an IDX real estate website with WordPress and set the foundation for growth.
Building an IDX website can be a trajectory changing moment for your business and life. You will have more avenues to market yourself and more tools to capture leads than ever before.
There will be a lot of decisions to make. But this guide will help you along the way. We’ll show you how to think about each aspect of your website as well as the pros and cons of various services.
We’ll go step-by-step using tools and features that don’t require any coding. And in the end, you’ll have a powerful real estate website to help set your business apart.
Step 2: Hosting
Step 3: Install WordPress
Step 4: Choose IDX Software
Step 5: Theme
Step 6: Install IDX and Theme
Step 7: Connect to MLS
Step 8 and 9: Plugins
Step 10: Add Pages
Step 11: Configure Settings
Step 12: Lead Capture
Step 13: Create Content
What Is IDX?
IDX or Internet Data Exchange is why you and I are able to browse MLS listings online. More specifically, IDX is the set of rules, licenses, and technologies that allow real estate agents to access MLS listings, integrate them on their websites, and display them publicly.
In this article we will show you how to build a website with WordPress and incorporate IDX into it. IDX will be the part of the website where users can browse and search MLS listings. There are various IDX technologies, so we’ll cover each one individually.
For more on IDX, check out our blog What Is IDX?
What Is WordPress?
WordPress is a free, open source content management system software that has become the world’s most popular tool for building websites. By some estimates, WordPress powers almost 30 percent of the Internet, including websites belonging to some of the world’s largest companies.
WordPress uses a flexible architecture allowing you to mix and match plugins and themes to create virtually any website possible. Its flourishing development community also means there is no shortage of new features and tools released each year.
Why Should I Build an IDX Real Estate Website With WordPress?
The trends are clear. More and more homebuyers are moving to the web
As recently as 2017, the National Association of Realtors (NAR) reported that 51 percent of homebuyers found their home online. This percentage was even higher among the younger generations.
To compete and win leads, agents need to market themselves online by building IDX websites and incorporating the features leads want.
LUKES TIP:
We recommend WordPress for its flexibility, popularity, and ease-of-use. In our opinion, no platform offers a greater combination of development potential and intuitive design. After all, a real estate agent’s job is to sell real estate. An IDX real estate website with WordPress will allow you to get up and running online quickly, so you can get back to what you do best.
How do I Build An IDX Real Estate Website With WordPress?
Now it’s time to start building. Follow the steps below to get your site online and your IDX activated, or simply reach out to Realtyna to get things started.
Step 1: Choose a Domain Name
The first step to build a real estate website with WordPress is to choose a domain name. Almost right away, there are a few decisions to make.
What Should My Domain Name Be?
You should think strategically about your domain name because you want it to help market your business. If you have developed a brand already, go with your brand name. Otherwise, try to think of some important SEO terms related to real estate, your location, and your marketing niche.
A lot of agents use some variation of their name. This is great for pointing leads you meet in person to your website. But it’s not so great for attracting leads that you haven’t already met.
Where Can I Register My Domain?
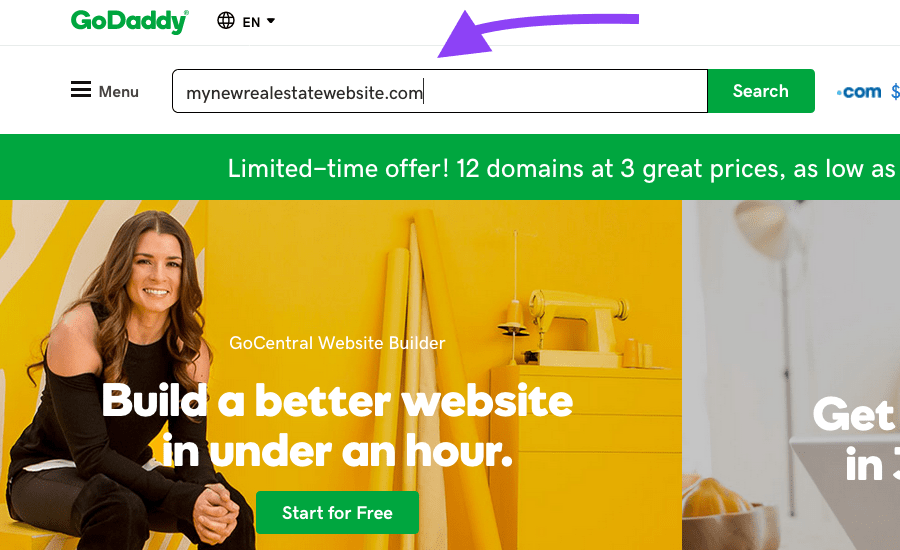
Once you decide on a domain name, you need to check its availability and register it. If you have an idea of where you’d like to host your site, you can register it there and buy hosting in one step. Or you can use GoDaddy.com or another popular domain registrar.
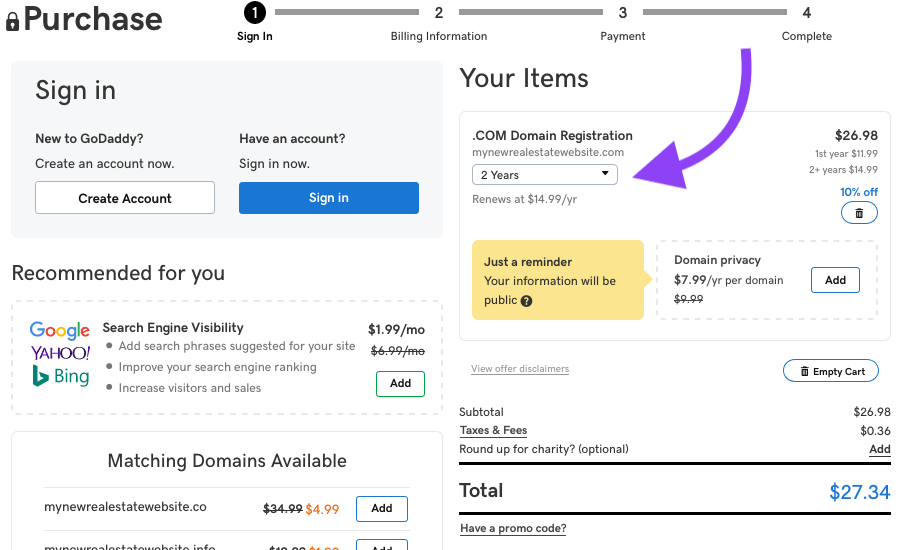
Go to GoDaddy.com and type in your desired domain name.
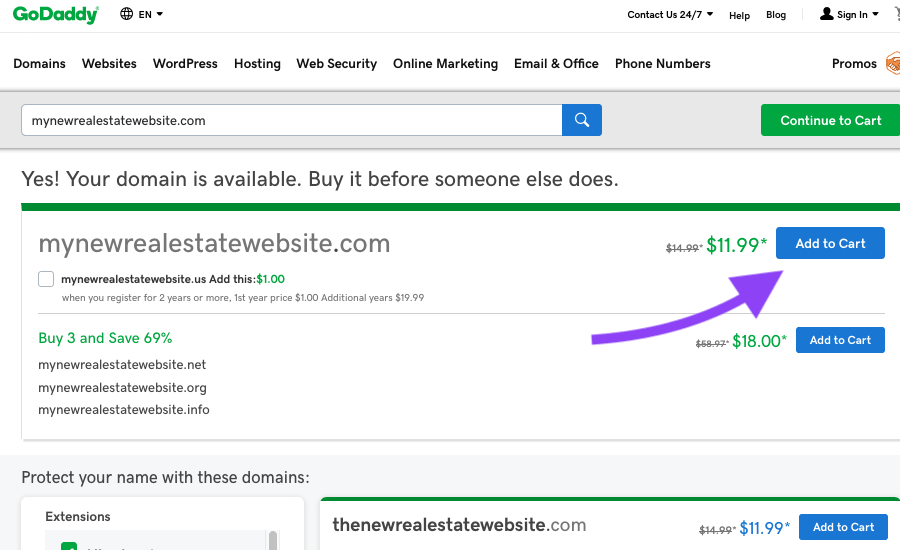
Once you confirm it is available, add your domain name to your cart.
Select a term, and then check out.
Step 2: Choose Hosting
If you want to publish a website to the Internet, you’ll need a place to host it. Your hosting will store all the files related to your website as well as listing data, blog content, and other information. There are a number of hosting providers that offer similar services such as, Bluehost, Dreamhost, Hostgator, and many more. Be sure to price shop and compare their customer service before making a decision.
How Much Hosting Should I Buy?
Your hosting purchase is going to depend on the type of IDX system you buy. There are iFrame, RETS, and mixed systems.
A simple iFrame site is not going to require much hosting at all; 50 GBs should be plenty. We’ll get into this more in step 4, but there are some reasons you may not want to choose an iFrame system.
A more robust option will be an Organic or RETS system. Here your disk space will depend on the number of listings in your MLS. You will need to check with your MLS and IDX vendor for their hosting requirements, but it can easily surpass 100 GBs.
A mixed system will be in between.
How Do I Buy Hosting for my IDX website?
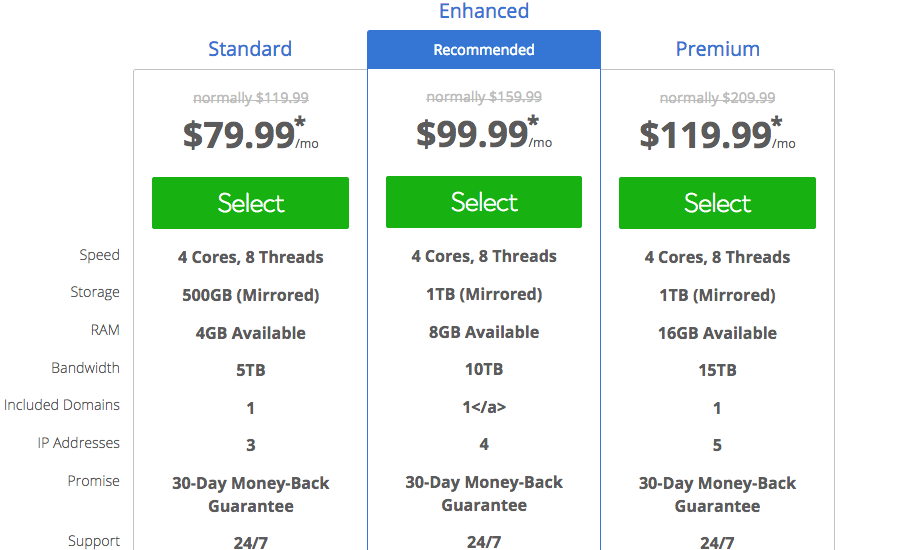
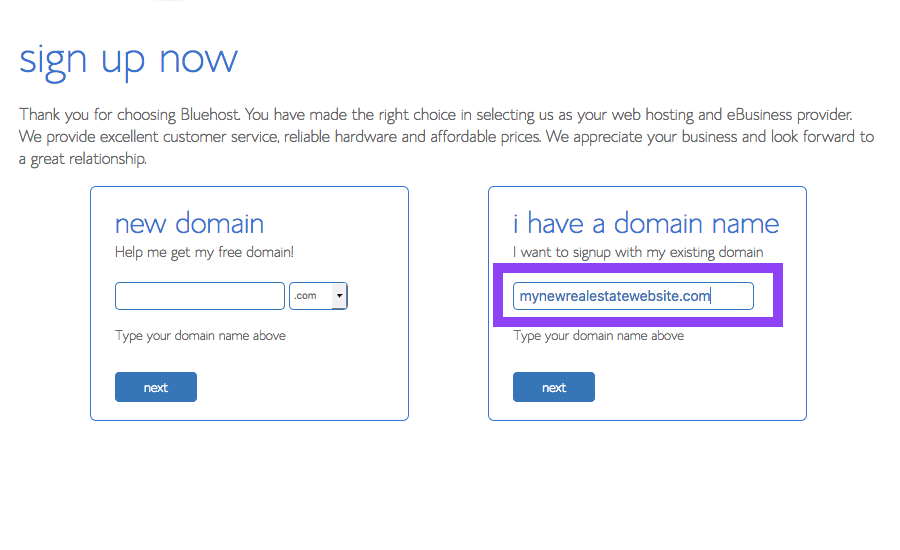
Go to Bluehost.com or another hosting provider. And browse the plans.
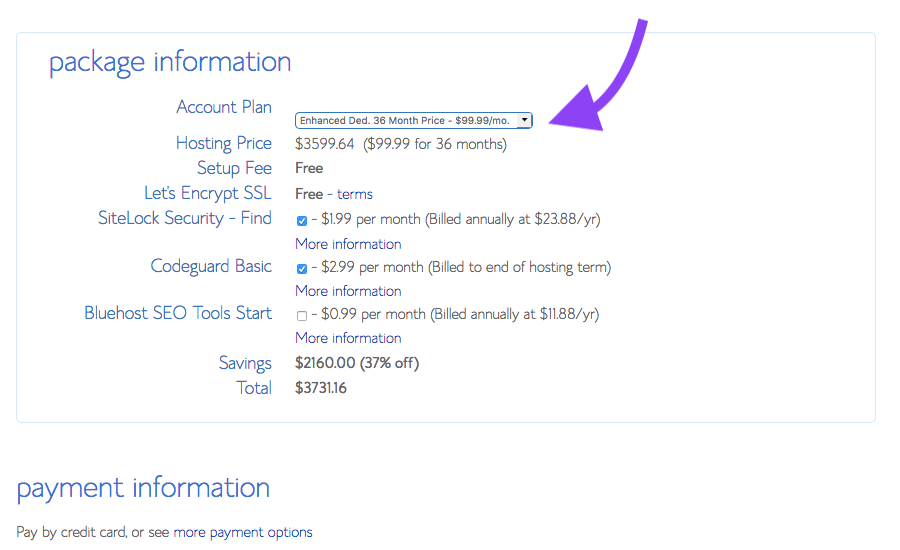
Select a plan that best fits your needs. Here we’ve chosen dedicated hosting. Dedicated hosting is best for robust IDX systems like Organic/RETS, but it may not be necessary for other IDX types.
Select a term. Then check out.
Step 3: Install WordPress
You have the foundation of your IDX real estate website in place. Now it’s time to add WordPress. We’ll show you how to do this with Bluehost, but the steps will be pretty much the same for most major hosting providers.
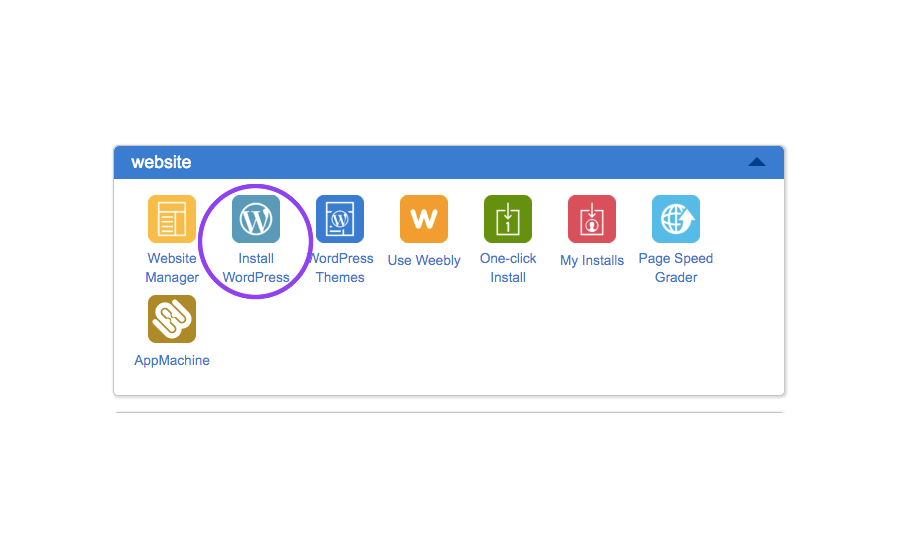
Log into your admin panel. Find the website menu and click “Install WordPress.”
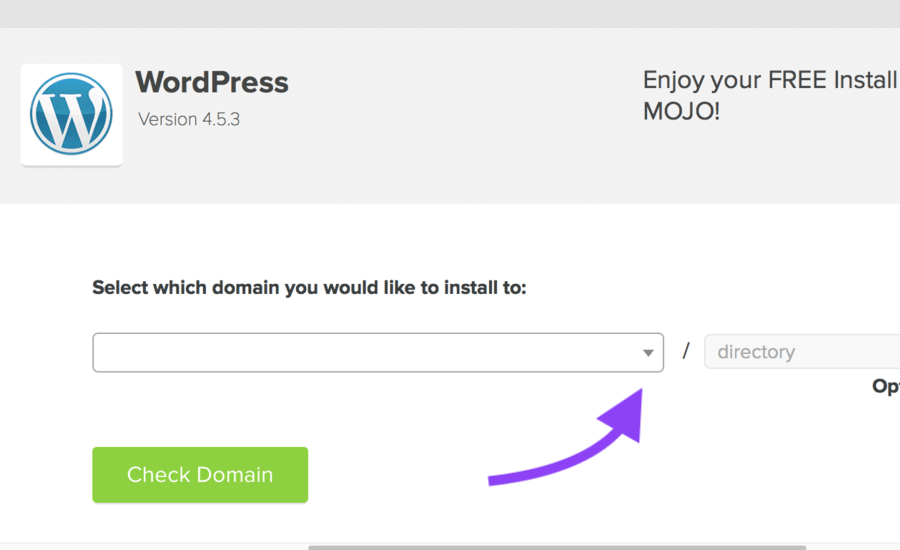
You’ll be automatically taken to MOJO one-click WordPress install.
Enter your domain name and click “Check Domain.”
On the next screen, you’ll have the opportunity to set up an admin and password. When you are ready, click “Install Now.”
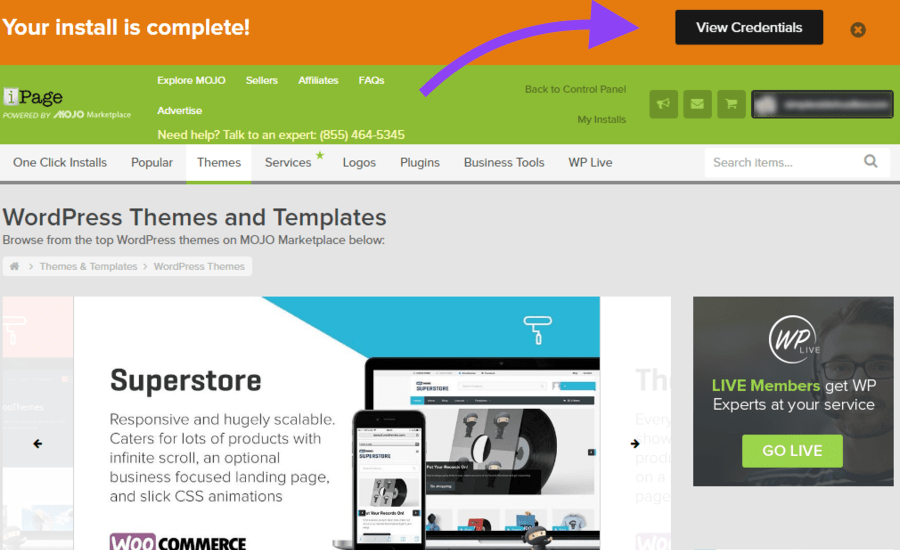
Once the install is complete, you can click “View Credentials” to see your admin login and password again.
Now you are free to log into your WordPress site and begin work.
Step 4: Choose IDX Software
Choosing your IDX software is among the most important decisions you’ll make while setting up your IDX real estate website with WordPress. So take some time during this step, do your research and make a good decision. We break down the main IDX systems below. For more, check out our blog SEO, RETS and iFrames: Everything You Need to Know to Make a Smart IDX Decision.
What Are My Options for IDX?
iFrame
One of the earliest ways to display MLS listings online, iFrame IDX persists due to its low upfront cost. iFrames are a design element that allow users to take content that exists somewhere on the web and “frame” it, so it appears on their site. iFrames are quick to set up, and they allow you create the appearance of having much more content on your site than you actually do.
But iFrames come with a major drawback: they are not indexable. This means they are not recognized by Google and other search engines, which can sap your SEO and limit your web marketing. Further, iFrames are one-size fits all, so you have virtually no control over the look and feel of your property display.
Organic/RETS
Organic or RETS systems provide an upgrade over iFrames for SEO purposes. Instead of framing the MLS listings on your site, Organic or RETS IDX systems will import them so they reside on your website servers. This is why you may need a larger hosting plan with this type of IDX.
Hosting your own listings allows Google and other search engines to “read” them and count them toward your page rankings. This can have a dramatic impact on your web visibility. Consider it this way: if your MLS has 20,000 listings in its database and you use and Organic or RETS IDX, you will have 20,000 pages of new SEO content on your site.
Many MLS also provide RETS feeds for no extra cost. This can eliminate your monthly payments and save you money in the long run.
Mixed/ Semi-Organic
Mixed or semi-organic systems provide some aspects of iFrames and some aspects of RETS. They try to find the balance between the two by importing some content to your site by hosting some of it elsewhere.
Semi-organic systems can help you capture more SEO value than iFrames, but probably not as much as Organic RETS. And you’ll definitely have to pay monthly fees to your IDX provider.
There’s one other IDX system that you may come across: FTP. FTP is a legacy technology that does not match the speed or flexibility of RETS, but it is still offered by some providers.
What Else Should I Consider?
Once you choose the type of IDX system best fits your business, you should shop around for a provider. Make a list of those that are WordPress compatible, and then compare the features they offer.
Flexible Design
Your website is going to be the foundation of your web marketing, so you need to make sure you can make your vision a reality. Choose an IDX with flexible design options. Obviously, you should be able to change colors and fonts. But what about the map search? Can you change its orientation or where it appears on your site? Think about the best possible site you can build. Then, talk to a sales person and ask them to show you how to recreate it.
Lead Capture
The number one goal of any real estate agent is to close more leads. So you should get into the nitty gritty with some sales people about lead capture. Can you force users to register? Can you notify them by SMS? Can you link your IDX to Facebook? Get on the phone and don’t hang up until you have a full picture of what is possible with the IDX offered.
Analytics
More and more leads are asking for data to help inform their buying decision. So you should ask the IDX provider about analytics. Can you embed market information such as valuation changes, or average square footage into the property listing page?
Ease of Use
Lastly, you need to be able to use the IDX quickly and efficiently. So ask the IDX provider for a free demo. The back-end should be clean and intuitive. The easier it is to use, the quicker you’ll be able to update your site, and the faster you’ll be able to get back to selling homes.
Step 5: Choose a Theme
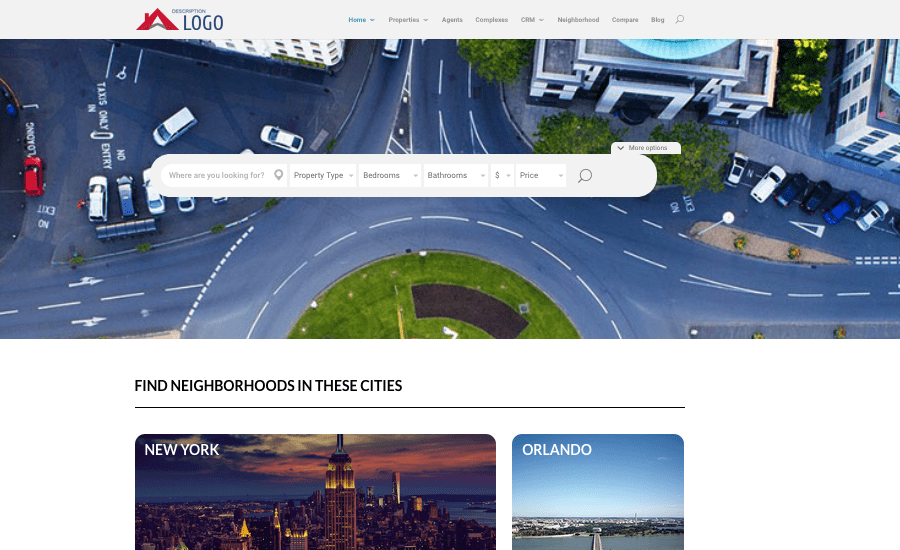
After choosing an IDX software, you should pick a theme for your website. Some IDX providers offer their own themes. Some integrate with popular WordPress themes. You’ll have to ask to see what your options are, but here are some of our favorite themes for an IDX real estate website with WordPress.
Divi
Divi is one of the web’s most popular themes and front-end editors. Drag-and-drop design allows anyone to build a powerful, function website.
Agent Press Pro
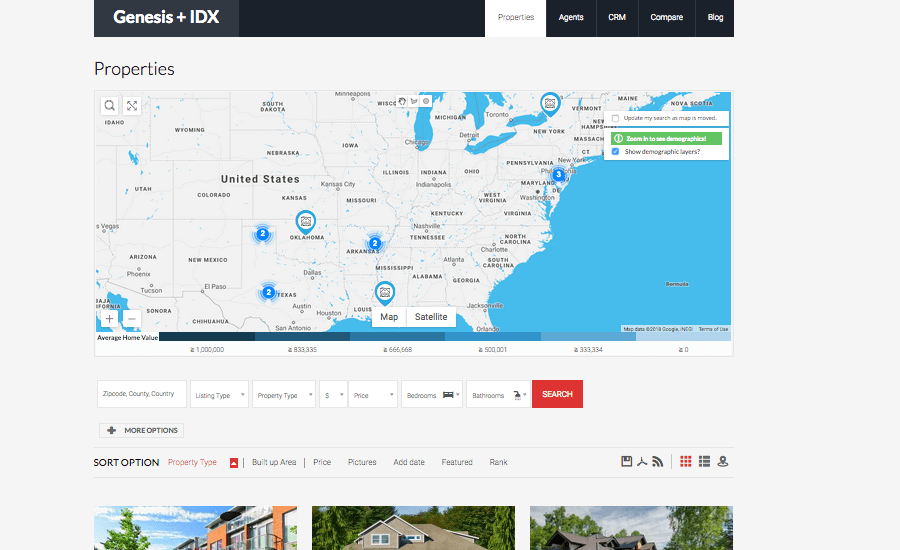
Agent Press Pro takes advantage of the Genesis Framework, a massive development community within WordPress. It offers custom headers, multiple homepage widget areas, layout options and feature images to highlight your brand.
Avada
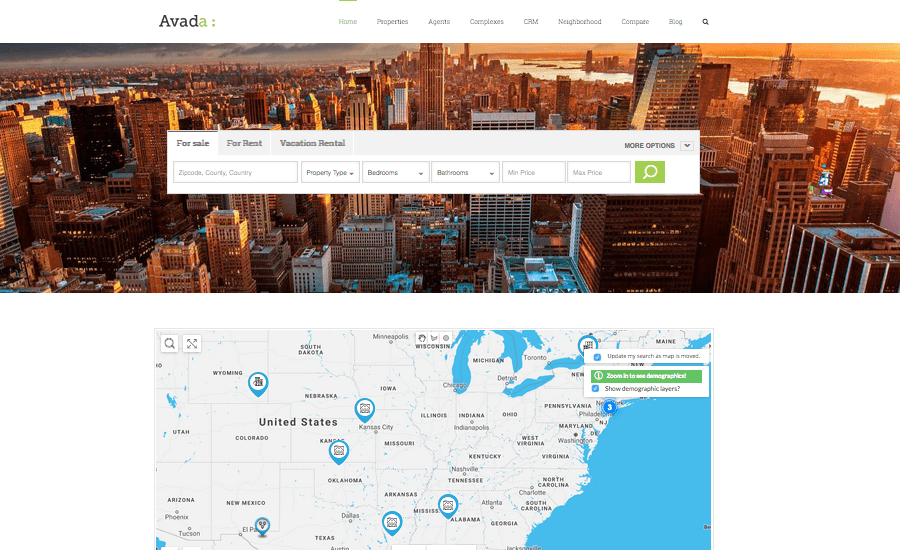
Avada says it is the number one selling WordPress theme in the world. Looking at the features, you can see why. It is highly flexible, offering multiple responsive sliders, header area options, widget sections, and sidebars.
Enfold
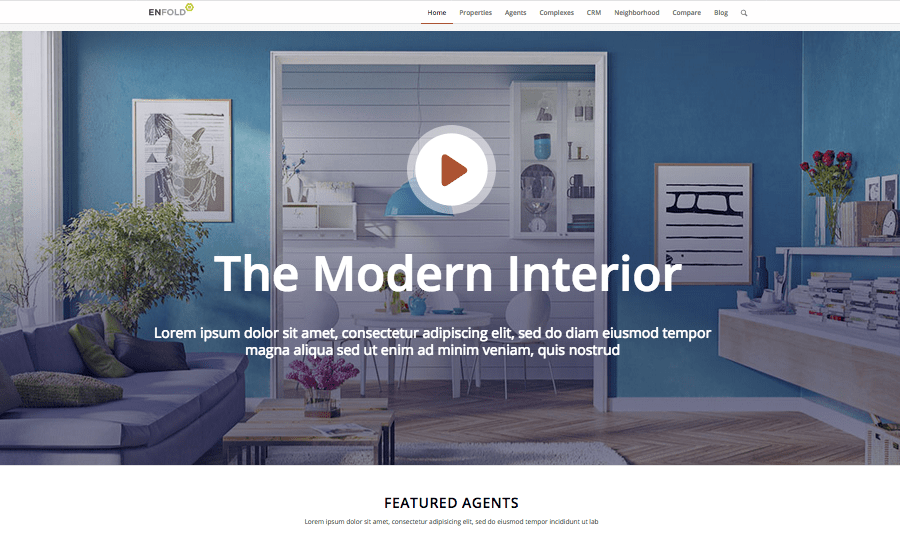
Enfold is built for speed and precision. It loads features on your site based on usage, which can improve your pagespeed score and keep leads browsing longer.
Bridge
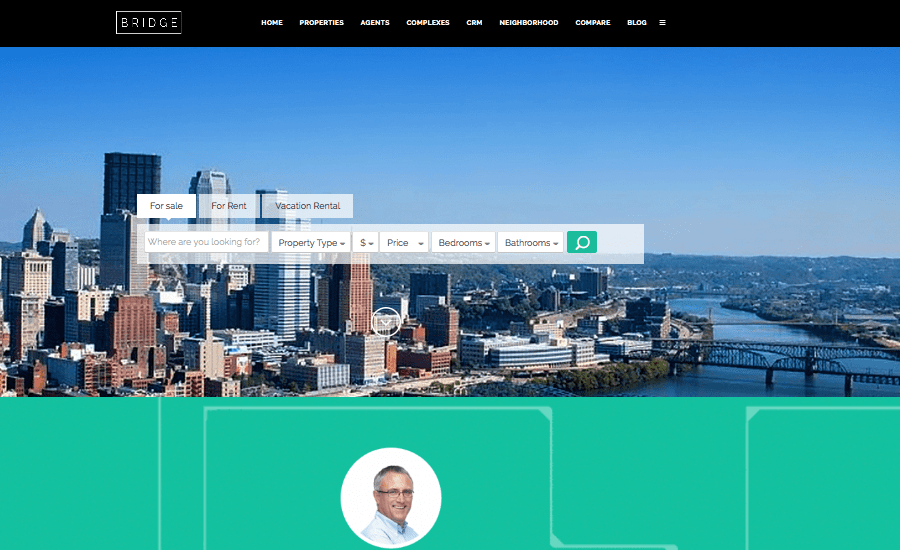
Bridge is one of the most popular themes available for WordPress because of its flexibility in a variety of contexts. It includes full-screen video support for splash page development, sticky headers, and WP Bakery Page Builder, a drag-and-drop page builder.
How Do I Choose a Theme for My Real Estate Website?
Choosing a real estate website theme is more than looking at nice photos. You need to think about the functionality of your site and the type of features you would like to have. Do you want a splash video to welcome visitors to your site? What lead capture strategies do you plan to employ on your homepage? How comfortable are you with web editing? For more on this subject, check out 5 Things to Know Before Choosing a Real Estate Website Theme.
Step 6: Install Your IDX and Theme
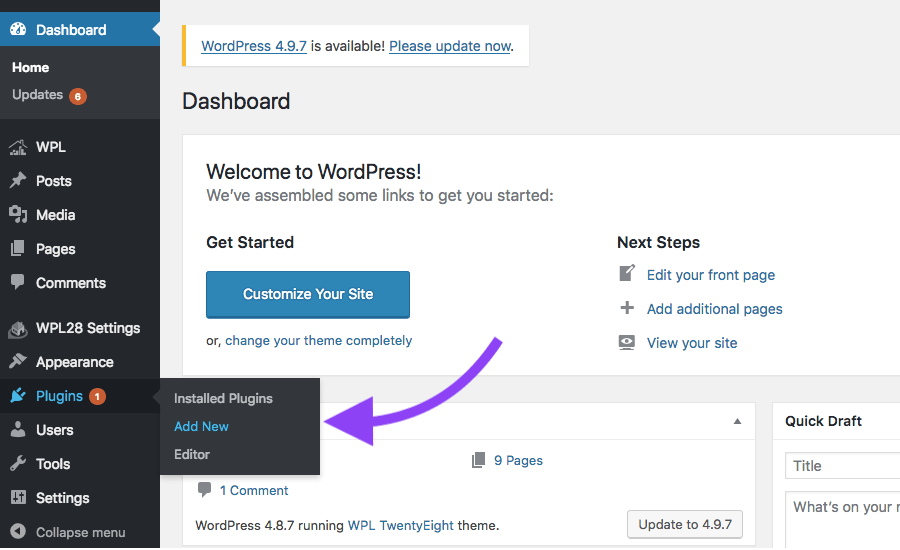
Now it is time to install your IDX software and theme and see your website come to life. Let’s start with IDX. Your IDX provider should provide a zip file of your software. You should download this file to your computer. Then, follow the steps below to add it to your WordPress site.
Log into your WordPress site as the admin. Then navigate to your dashboard.
Hover over “Plugins” then click “Add New”.
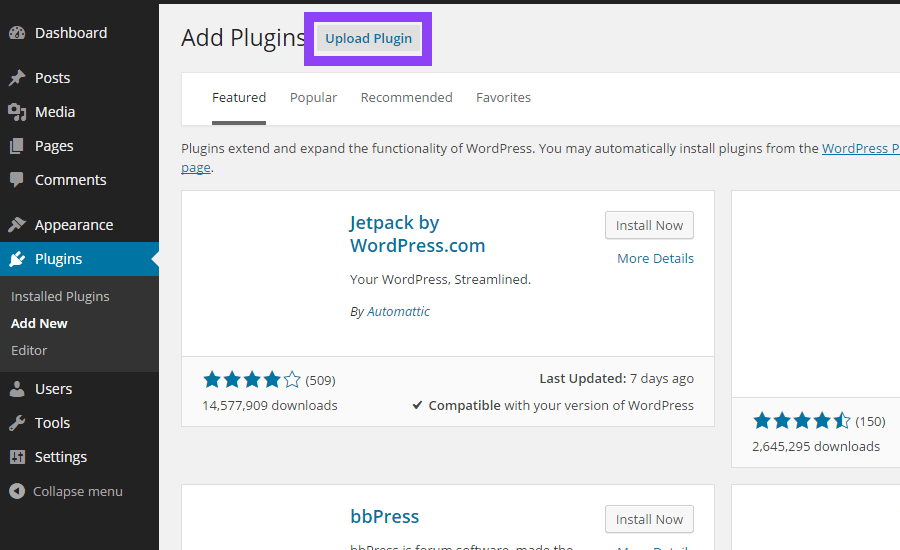
Then select “Upload Plugin”
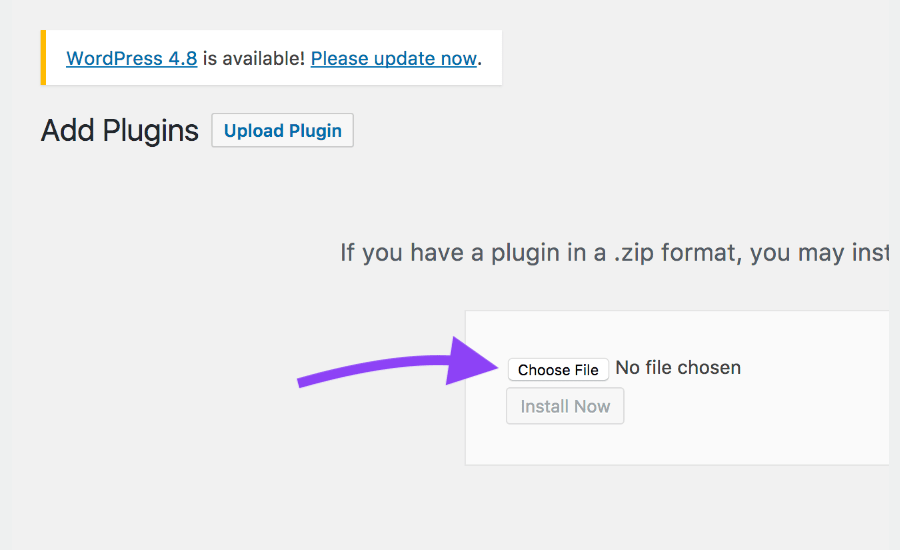
Then click “Browse”.
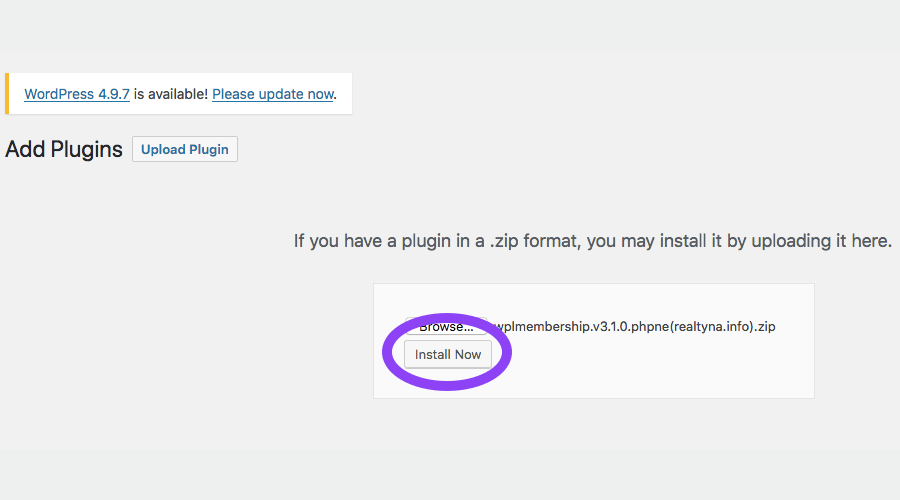
Find your software file, open it, then click “Install Now.”
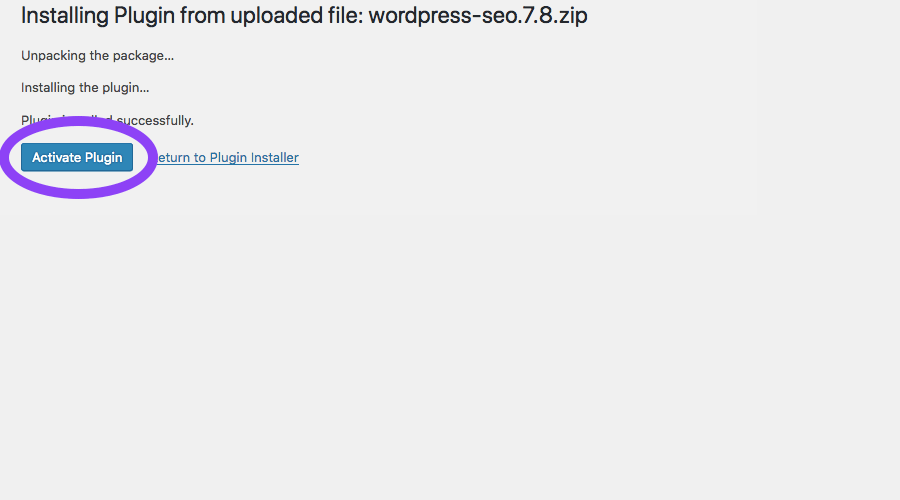
Once installed, click “Activate Plugin” to begin using your IDX software
With your IDX software installed, you can move on to your theme. Much like with your IDX software, you should have a zip file with your theme package. Follow the steps below to install and activate.
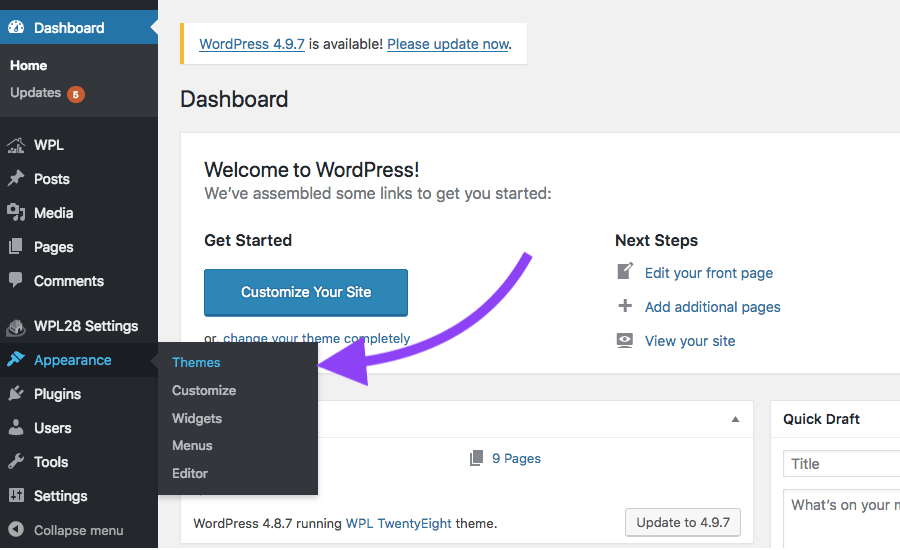
From your WordPress dashboard, hover over “Appearance” then click “Themes”
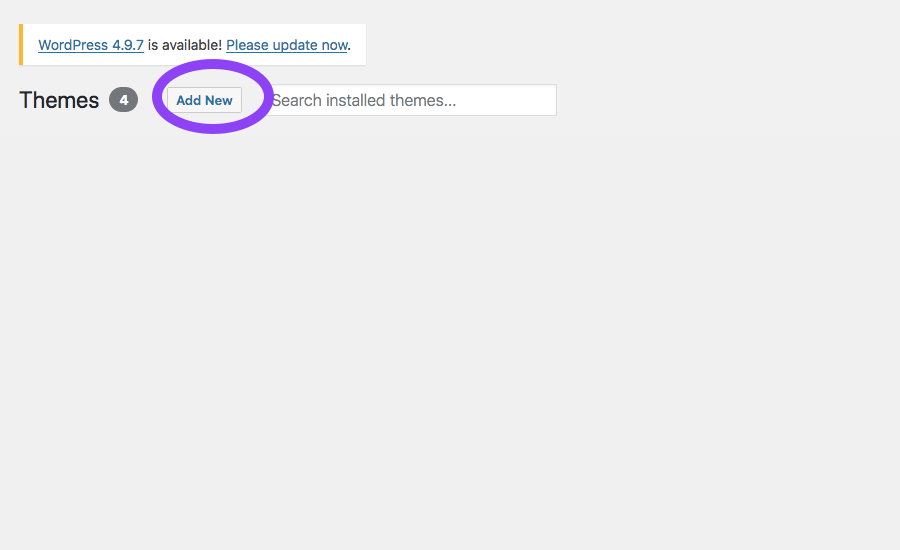
Then click “Add New.”
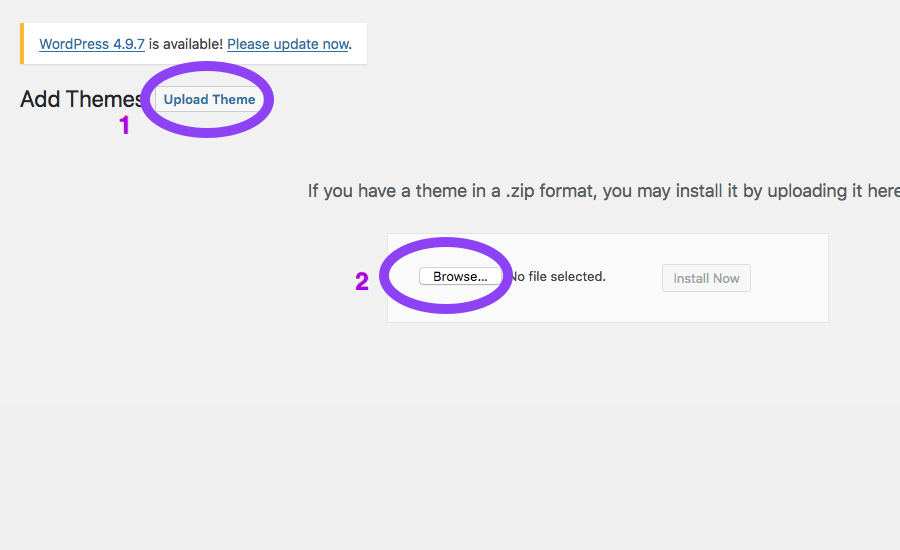
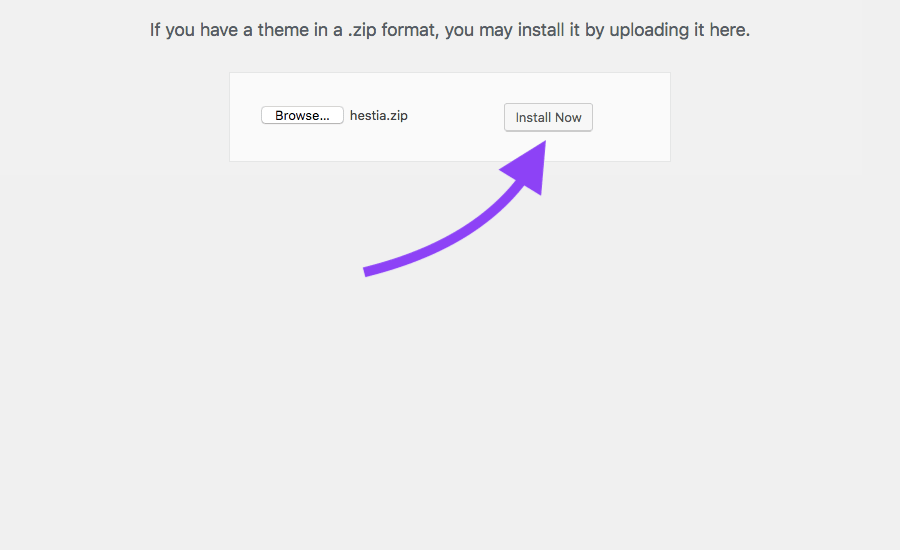
Click “Upload Theme.” Then, click “Browse.”
Find your theme file, open it, then click “Install Now.”
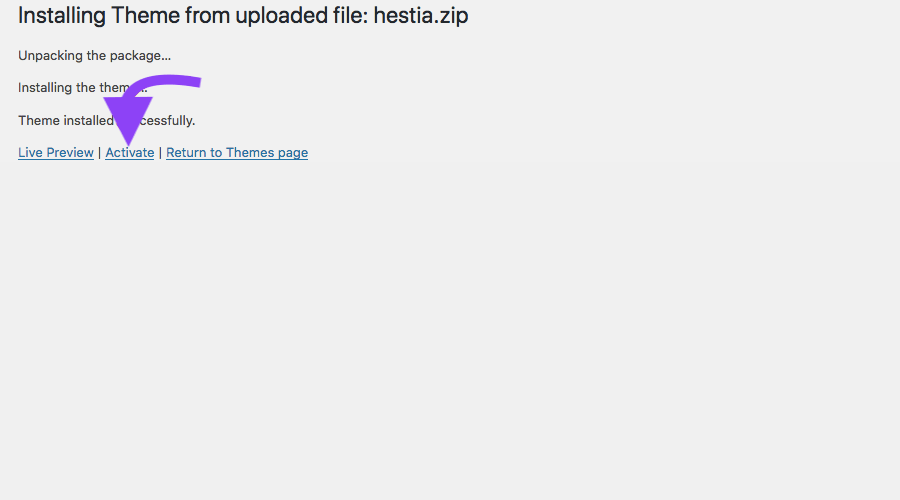
Once installed, click “Activate.”
Step 7: Connect to the MLS
With your IDX software and theme installed, your real estate website is taking shape. Now, you can link it to your MLS. This will activate the IDX on your website, so that MLS listings begin to appear. This step will depend on the type of IDX system you have.
Activating an iFrame
To activate an iFrame IDX, you’ll need to copy some code from your IDX provider to the desired page on your website. This code is usually made available in your account or admin page on the IDX provider’s website. Once you add the code and save the page, the new feature should appear on your front-end with an iFrame to view MLS listings.
Connecting Organic/RETS
For an Organic/RETS system there will be some more work to do, but the benefit will be a more powerful SEO site. To activate an Organic/RETS system, you’ll first need to get a username and password to access your MLS RETS server. You can do this by calling your MLS and asking to speak with the RETS administrator.
Simply explain that you are building an IDX real estate website with WordPress and that you would like to know the requirements and fees to get RETS access. We have more details in How to Get a RETS Feed.
Note: the following steps are more technical in nature. While it is certainly possible for you to complete them during your IDX real estate website build, many IDX providers will complete them for you as part of your software purchase.
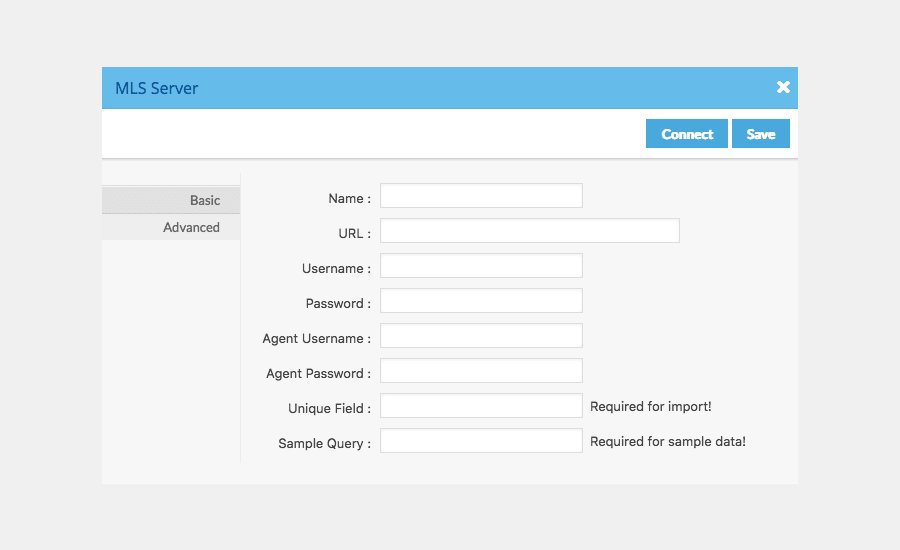
Once you have your RETS username and password, you should insert them in your IDX software.
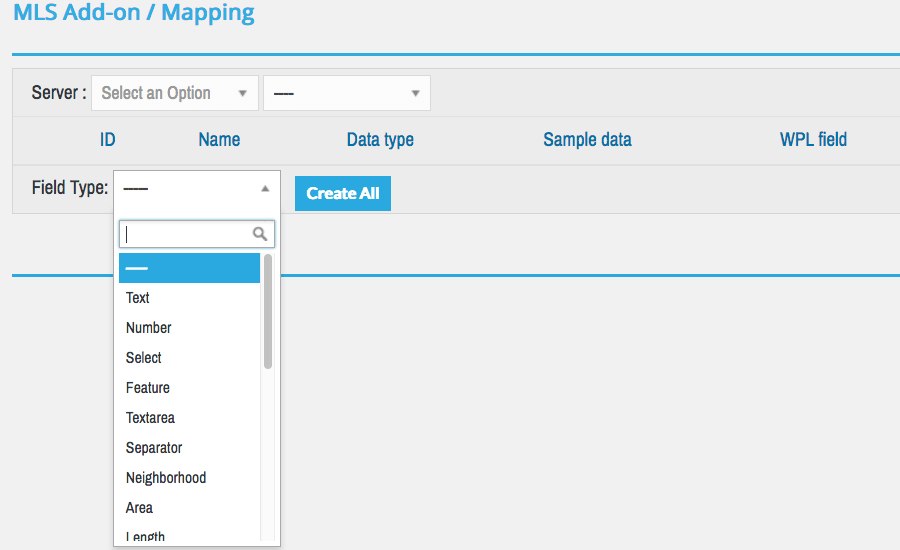
This will allow you to connect to the MLS RETS server. Once your connection is established, you should use your IDX software to map RETS fields to the appropriate locations on your site. This will ensure that each piece of data appears in the right place.
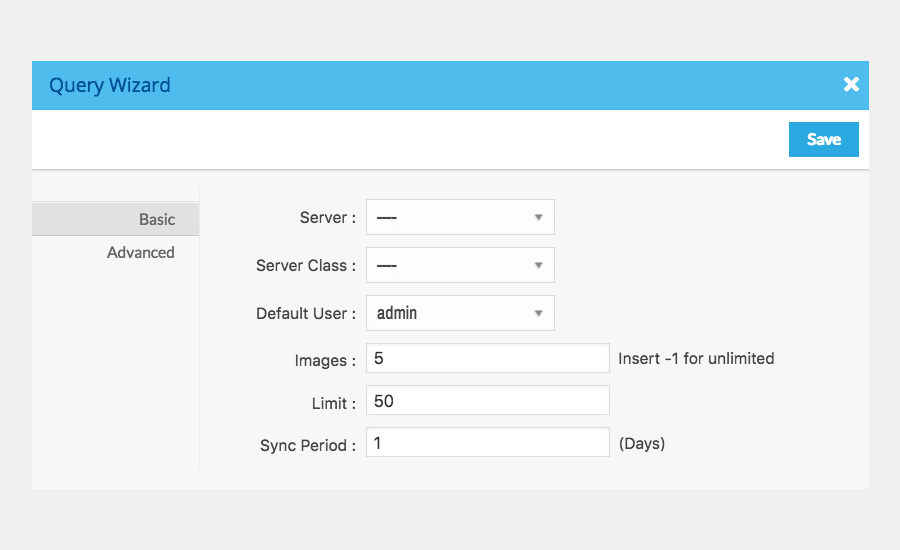
At this point, you should set up queries to tell the software the types of listings you want to import and where they are located.
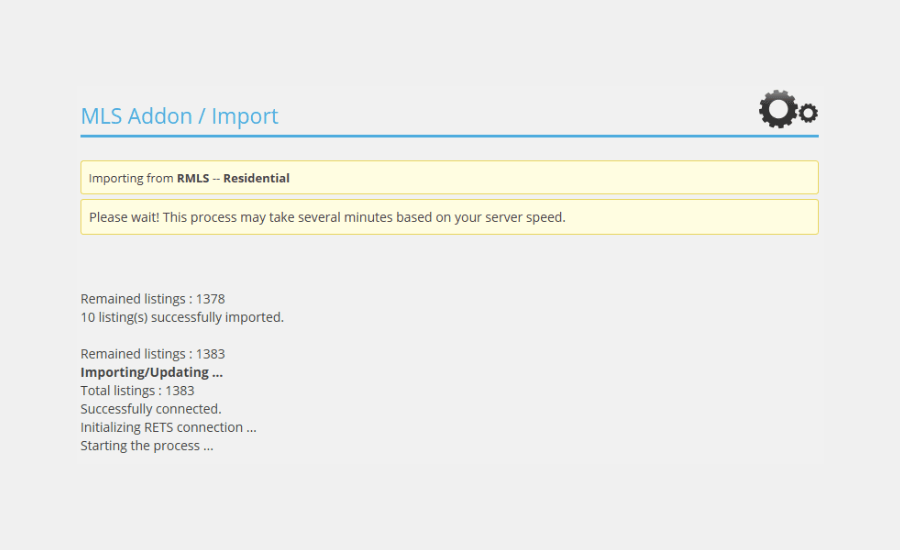
Import a few listings to confirm data accuracy. Make any mapping or query adjustments necessary.
When you are ready, you can run a full import of all listings. This may take several hours depending on your server settings.
Now you may set up synchronizations. Add the relevant commands to your chron-job system to run the import process automatically.
At this point your RETS IDX system is connected and active. You may move onto the next steps.
Step 8: Choose Some Plugins
One of the great things about WordPress is its modularity. There are thousands of plugins available that can expand the functionality of your site. You can browse them all at WordPress.org/plugins. We’ll highlight four here.
WPML
WPML is a translation plugin, allowing you to build a multilingual real estate portal and attract foreign buyers.
WP Bakery Page Builder
WP Bakery (formerly Visual Composer) has long been known as one of the web’s most powerful ad page builders. Its front-end editor allows you to make changes as you browse your site.
WooCommerce
WooCommerce is a popular ecommerce platform, allowing you to set up a shop and accept payment online.
Yoast SEO
Yoast SEO allows you to optimize keywords, content and permalinks to attract more visitors from Google and other search engines.
Step 9: Install Your Plugins
Installing your plugins will follow the same process as installing your IDX software, so refer to step 6. You should note, however, that not all of the plugins available for WordPress will be compatible with your IDX software. You should do your plugin tests before you make your site live. Or check with your IDX provider.
Step 10: Add Pages to Your Site
You now have all the software you need on your site. It’s time to start building out your site with pages. We’ll make a few suggestions below, but this is all about you. What is your vision for your site? What information do you want to convey to people?
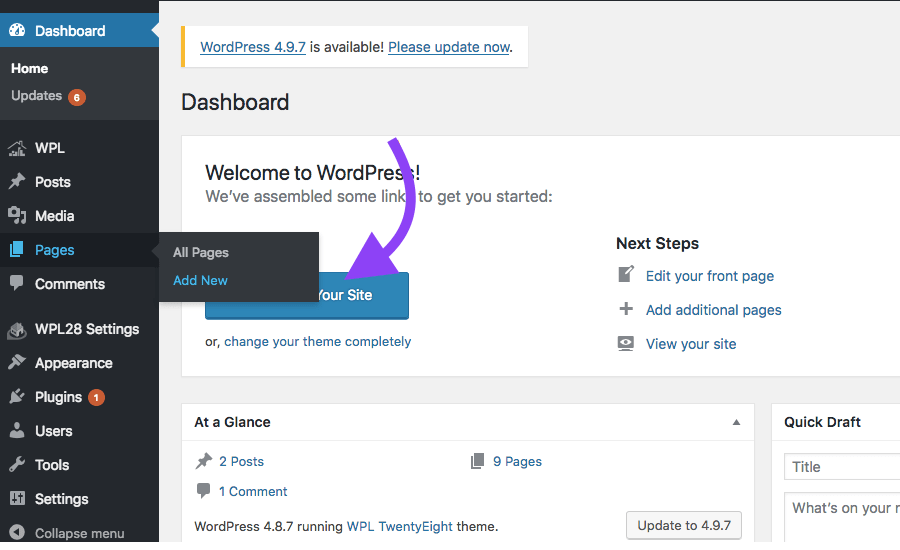
To add a page to your site, navigate to your dashboard, hover over “Pages” then click “Add New.”
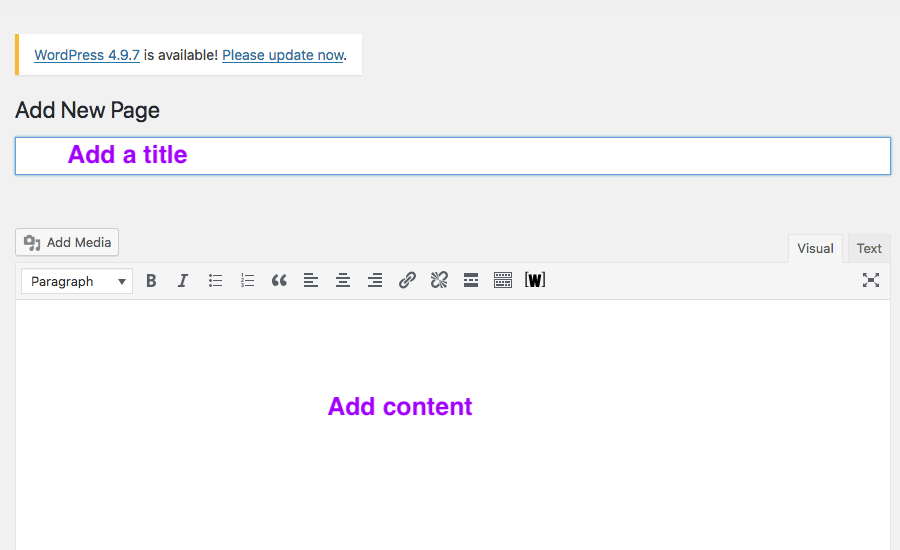
Then you can add a title, add content, and publish.
Introduction/Home
Your home page should invite your guests to interact with your site. Some agents use a carousel to highlight featured properties. Some use a splash video to build a narrative. Others have a search bar with a call to action. Your home page should welcome visitors to your site and connect them seamlessly to your website features.
Bio/About Me
For many of your clients, your website will be their introduction to you. So make sure you have a robust Bio page. You want to use your bio to show some personality, but also demonstrate an expertise. We have some more tips in our blog How to Make a Rockin’ Agent Bio for Your Real Estate Website.
Neighborhoods
Competition for leads is tough, especially with the many portals out there that dominate the search engine rankings. Despite all their SEO content, portals lack knowledge. They can’t get into the specifics of a community or explain a neighborhood block-by-block. This is where agents can shine. Create neighborhood pages and develop your local expertise.
Reviews/Testimonials
If you have a good relationship with a client, you should ask him or her for a review. Collect a few of these and place them on a separate page on your site to provide social confirmation of your abilities.
Step 11: Configure Your Site Settings
With all the new software on your site (IDX, themes, plugins), there will be a number of configurations to make. Take some time and go through each one in your WordPress dashboard. Learn what the setting does then configure it as needed. Here are some settings you should keep in mind.
Url Patterns and Metadata
Use the url pattern and metadata options to optimize your site and control how Google and other search engines index it. We have more on SEO in our blog IDX SEO Everything You Need to Know.
Listing Page
Your listing page options will allow you to control the orientation of your listing page and the features on it. You can edit the contact form, change the default photo size, and more.
Map Search
Your map options will allow you to create defaults for zoom and geolocation. If you have polygon search or save search features, you can activate them here.
Theme Settings
Your theme settings will allow you to control colors and fonts and insert CSS code to modify the stylings across your site.
Step 12: Activate Lead Capture
The whole point of your site is to attract visitors and convert sales. So before going live, take an inventory of your lead capture features and activate them where necessary. In many cases you will do this using the WordPress widgets panel. Configure a widget area, then drag one of your lead capture widgets into it.
Here are some to check out.
Forced Registration
After a certain number of property views, forced registration will throw a popup that requests or requires a user to register to the site.
Saved Search
Any registered users will be able to run searches, save them for later, and receive notification when new property populates that matches that search.
SMS Notification
SMS notification will transform saved search notification and other communications into a text message delivered to your lead’s phone.
Favorites
Favorites will allow your leads to save listings and monitor them over time.
CRM
Base CRMs will allow you to collect contact information, set meetings, and monitor communications. More advanced CRMs include auto-responses and custom workflows.
Step 13: Create Content
Congratulations you’ve built an IDX real estate website with WordPress. But your site should not remain static. The strongest SEO sites are constantly generating and publishing content. So create a blog and try to post to it several times a week. To get you started, here are 11 real estate blog post ideas and 12 real estate blogging tips for beginners.
Real estate is a very visual business. People use property photos, home tour videos, drone views and more to tell the story of a piece of real estate. All of this is great for social media. So link your Facebook, Instagram, Pinterest, and Twitter accounts to your website and use a social media calendar to plan your posts.
An IDX real estate website with WordPress can help transition your business to the next level. Follow these steps to get your site off the ground or leave a comment below with any questions or suggestions.


Dawn Huddleston
Posted at 22:29h, 05 JanuaryIs there any other host other than WordPress that can host IDX?
Christine
Posted at 10:49h, 06 JanuaryHi Dawn,
In case of using IDX through our products, any hosting, meeting our system requirements, will work. In this case, WordPress role is not hosting – its role is being a platform, which should be installed on a host server. Our team can help you with setting up the whole system and installing our products on it.
Sell a home in cleveland
Posted at 01:25h, 20 JanuaryWell described. Thanks for sharing very interesting and educative information with us.